The internet went a-buzz when Benefit Cosmetics started leaking information about their they’re Real Push-Up Liner. They did a couple advanced sales between their site, Sephora, and Ulta and then everything was kept mum until its official release on June 27.
I am already a gel liner user – I find using an angled-bristle brush with gel gives me the most control and best results. I also like gel because it is pretty smudge-proof and long lasting. As I’m sure you can imagine, I was intrigued when I heard about Benefit’s they’re Real Push-Up liner. For $24, however, I decided that I would pass for the time being; although I like to try new things, I was already happy with my liner and didn’t want to drop that kind of money on a single eyeliner.
I actually made a Sephora order for other things on June 27 and to my delight found that one of the samples they were offering (via promo code) was a Benefit they’re Real Push-Up Liner deluxe mini. Of course I got it, we need to try it for science after all, especially considering all these top bloggers/vloggers got it early and are losing their minds over it. It is really innovative and clever, but it is that good?
Always a skeptic.
Because it arrived when it did, I didn’t have much time to fuss with it. I took a few photos of the product itself, but didn’t bother trying to apply it. I did poke at the silicone tip to get an idea for just how flexible it is – too much flexibility could cause me to make a ridiculous mess on my lids, so I wanted to know what to expect. On Wednesday I played with it, and Thursday I actually used it for the day!
I found that you have to turn-click the product’s base several times before product comes to the tip. It is important to do this slowly, especially for your first use. You don’t want too much product on the silicone, “AccuFlex,” tip, or else you’ll end up making a mess when you apply (unless you wipe if off first, but that’s wasteful – and I don’t know about you, but I’m not trying to waste any of a $24 product). So I clicked it up until it was about flush with the silicone AccuFlex tip – it protruded ever-so-slightly, but I think even a millimeter would be too generous an estimate of how far. You may not get as lucky with your and may have to tap or wipe yours even.
Here’s how it looked when I applied:
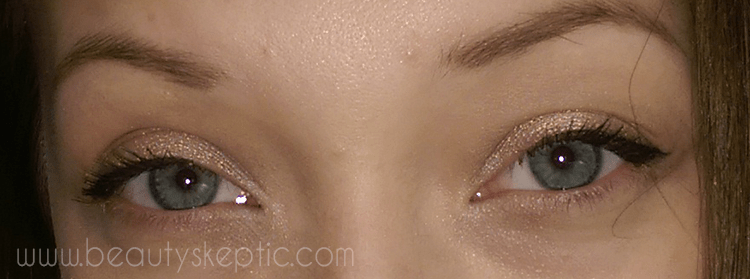
Yes, I realize my head is tilted, sorry. You can at least see the left wing well!
I had the best luck with this, which seems to be what Benefit recommends for they’re Real Push-Up Liner – and it is about the same method I use for regular lining:
- Twist product up (we’ve covered this).
- Press the tip along your lash-line three times, stamping the product at the beginning, middle, and end of your line.
- Connect the stamps.
- (Optional) Create a wing by placing the shorter side of the AccuFlex tip closest to your lower lashline and angle the longer edge outward as if you are ‘continuing’ or following the (imaginary) line of your lower lashline. Stamp again and pull inward to the outer corner of your eye.
- (Optional, required if you do step four so you don’t look foolish), connect the upper, outer part of the wing with the rest of your liner by sweeping the AccuFlex tip over towards it.
Stamping is super easy with they’re Real Push-Up Liner, and just like with gel and a brush, it is way easier to connect a series of three shorter points than it is to completely free-hand it. There’s less room for error, this way; these innovative silicone tip and these instructions really make this aspect of application of this matte gel liner very user friendly.
Here are a photo of the liner, eye nearly closed:

That’s about where the good things about this product end, unfortunately.
Application is not like butter. I found the formula of the gel to be rather dry and to skip and tug a bit, so I would have to pull it away and twist-click more product up, risking blobs near my lash-line. This might not be an issue if you like a thicker line, but for day-to-day, that isn’t for me. I am not a raccoon, after all. It took some work and going back over it several times to even out sparse areas as a result of the skipping – I figured this was preferable to risking smeared blobs, as I had heard it dries quickly. I found that much was true, and it actually made it a little difficult to even out the line.
Once I was satisfied with how it looked (finished at 7 AM, wings and all, I set about my day. I work in a reasonably low-humidity office and do not rub my eyes throughout the day (thanks glasses!). Around 11:30 AM, however, I noticed a black speck on my glasses.
What?
Part of my left eye’s wing had flaked and literally just fell off. What?! Especially since there’s all this hype about how it’s soooo good, so long lasting, not flaky, amazing, perfect, etc. I was right to be skeptical – I’ve never had eyeliner just decide to spontaneously disconnect itself from my eye. Here’s a picture, because it definitely happened. Oh hey, random gap:
 4.5 hours into wearing Benefit they’re Real Push-Up Liner a noticeable section flaked off
At this point, I was not impressed and frankly, kind of annoyed. I touched it up right away, and went back to this:

Another big thing about this product is that purportedly, its staying power is so dang good that you just have to buy their special cleanser to remove it easily. Your regular makeup remover simply won’t do it quickly and gently, they say! I didn’t definitely didn’t believe this, based on the flaking I experienced. That night, I went to remove my makeup and lo and behold – they’re Real Push-Up Liner came off even easier than my other gel liners with a Ponds wipe. I didn’t need to use three of them, I didn’t need to tug or scrub. Don’t waste your money on the cleanser.
Between the price, the skipping application, random flaking, and lack of longevity-as-promised, Benefit they’re Real Push-Up Liner is just not worth it – not in its current form, anyway. I love the innovative applicator; I think it is really cool to bring engineering into makeup to improve our experiences with products…but the formula of the liner itself is lackluster at best. My Maybelline Gel Liner kicks its arse, and I will continue faithfully using it instead. Hopefully Benefit will improve the formula of the gel that makes up they’re Real Push-Up Liner (research shows that I am not the only person with these complaints) because the applicator (AccuFlex Tip) is pretty neat…which is amusing, because my prediction was that I would love the formula, but find the silicone tip weird. If it cost about $10 less than it does, I might be a little more willing to work with it.


 May 2014 Favorites